As a general rule, free hosting is a bad idea. This isn’t to say that there aren’t a few free hosting providers that attempt a decent job, but in most cases you won’t have as much control over your site as you would like. Some compromises you may have to make include: ads you have no control over, restrictions from running ads, a long forgettable sub-domain address… just to mention a few.
If you truly cannot afford to pay for hosting or don’t want to pay, one of the best routes to go for is Blogger with a custom domain. As far as free hosting goes, this beats other providers by a mile. Here’s why.
What is a Custom Domain?

This is your personal real estate on the Internet. It is a top level domain in the form of yourblog.com as opposed to yourblog.blogspot.com which is a sub-domain. A custom domain is not free. Depending on the domain extension, that is, the last part of the domain after the dot, you may spend anything from $1 to $20 a year.
Advantages of Blogger on a Custom Domain
Most people starting their blogging journey want to keep their costs at a minimum. It is therefore logical to want to go with a sub-domain on Blogger or WordPress which are free. However, it is always better to make a small initial investment in a custom domain and then host your site on Blogger. There are several advantages to having your own domain name, these include:
- Preventing someone else from owning your dream domain name
- A professional looking web and email address
- Personal branding
Get Free Hosting With Your Domain On Blogger
The hosting is free on Blogger. You also don’t have to upgrade to a premium package to use your custom domain, as is the case with other free hosting providers. Once you have paid for your domain with your preferred registrar, you can host your site free on Blogger. Conversely, buying a domain on WordPress.com starts at starts at $18.00 per domain, per year while moving a domain name you already own costs $13.00 per domain, per year.
Choose From A Wide Selection of Themes
You can change your blogger theme to anything you like including using themes you have purchased or downloaded elsewhere. In WordPress.com, you can only use the themes available to WordPress.com users.
Blogger Widgets
With Blogger widgets, you can easily extend the functionality of your site. It may not be as great as a self-hosted WordPress site but it beats WordPress.com which doesn’t allow you to upload plugins. Many people migrate to self-hosted WordPress for this reason alone.
Your Blog is Safe from Arbitrary Deletion
Blogger’s content policy is quite liberal, and your site is unlikely to be deactivated unless Google is served with a copyright infringement notice or you are posting things like: hate speech; content that exploits children; or crude, violent, or harassing content. The same cannot be said of WordPress.com, as posting ads or other content they don’t like will get you banned without so much as a warning.
Register a Domain Name
The first step is to register a domain name. A search on Google for “domain registrar” comes up with hundreds of results. Check out this list of ICANN accredited registrars. The process should only you take you a few minutes.
Create a Blog on Blogger
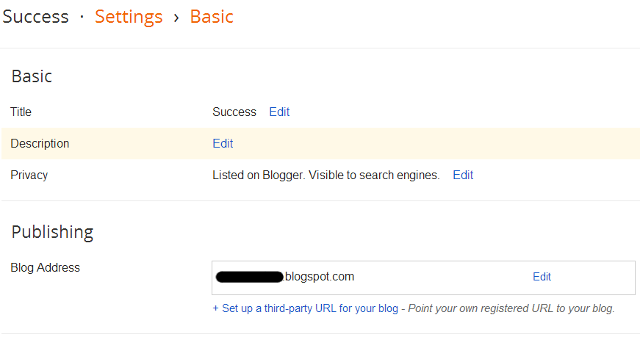
Once your domain is registered, go to Blogger and create a new blog using a sub-domain of your choice, for example,. yourblog.blogspot.com. Next go to Settings > Basic.

Click the option “+ Set up a third-party URL for your blog”. Enter the domain name you registered in Step 1 above in the space provided, Be sure to include the “www” part of the domain. The full domain name should be in the format http://www.yourblog.com.

After you click Save, you should get an error similar to the screen shot below.

Take note of the two CNAMEs listed. Each CNAME is made up of two parts: Name, Label or Host; and Destination, Target or Points to. The first CNAME is the same for all bloggers/site owners. Name represents “www” and Destination “ghs.google.com.” The second CNAME is specific to your site and your Google Account, and thus differs for each site owner.
Update CNAMES with Your Domain Registrar
I am using GoDaddy for this example. Log into your domain registrar’s control panel and locate the DNS settings. Where it says, Name, Label or Host type in “www” and enter ghs.google.com as the Destination, Target or Points to. Repeat the process for the second CNAME.

Next, locate your A Records. You need to create four different A records that point to four different Google IP addresses:
- 216.239.32.21
- 216.239.34.21
- 216.239.36.21
- 216.239.38.21
This will ensure that visitors typing in your domain with or without the “WWW’ still land on your site. You will need to wait for 1-4 hours for these changes to take effect before proceeding.
After this time, you should be able to add the custom domain without getting an error message. Google takes care of redirection such that once your blog on the sub-domain is requested, it redirects to your custom domain.

Finally, check out your blog using your custom domain in the browser and confirm that everything works well. If you get stuck, post a question in the comments section below.
Do you have any experience navigating free blog hosts? Has this helped you? Share your advice and tips for deciding between the free blog hosts.


